Tuesday, 23 June 2009

CoD UO Modding Tutorial - Part 6 : Creating Ladders and Stairs

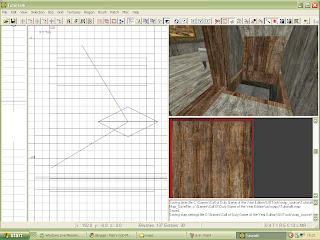
Being limited to one floor is not very good for any game creator so we need to extend our house up and down. We shall create a room upstairs, directly above the origonal room with the same dimensions. Paint the floor and ceiling the same but for the walls use the green wallpaper without the wooden panelling. Make a hole in the floor and the ceiling along the right hand side as shown in the picture below using CSG subtract. When cutting you will probably find some flashing bits of floor and ceiling in the wall where you cut the hole; delete these.

Now we need some steps to link the top and bottom floors so create a brush in the same texture as the floor and place it at the top. It needs to be the same length as the width of the opening, about 8 units across and 8 units high. Once in position, select it and clone it. Then move it down 8 units and put it in front of the first one. Repeat this until you have a whole staircase.

This staircase does not look very good from underneath or from the side so there are several things we can do. We could make a sloped brush to give the underside a completely flat surface, we could extend all of the steps down by 8 units to make them connect or we could cover up the underside of the stairs. We are going to use multiple methods so we can have an understairs cupboard with access to a basement.

To cover up the stairs we will need to make a large wall across the downstairs room. Do that now, taking care to remove any models behind it. Our understairs cupboard is currently wallpapered which is not very realistic. To isolate the part of the wall under the stairs and that which is above we will need to cut it with a brush. Create a 128x64 brush, 8 units high, and rotate it 45 degrees about the x-axis. To do this select the brush, goto 'Selection > Rotate > Arbitrary Rotation...', type 45 in the x box and click ok. Now move the brush around until it is just below the underside of the steps and not intersecting with them. Make sure that it intersects the outer wall but not the inner wall and then click 'CSG Subtract' (Save first, and if it breaks then reload, move the brush around and try again.


Sometimes when using CSG Subtract you will find a brush that will refuse to cut what you want it to cut and in these cases it is best to try and get around them by other means. When I tried to cut the inner wall it would not work so I deleted the inner wall and copied the outer wall and used that instead. Unless your CSG subtract cut through the inner wall then delete the inner wall and clone all of the outer wall and move it across. The outer wall is too long, so with only the end piece selected drag from outside the brush to make it smaller.

With the new walls in place we want wallpaper on one side and wood on the other so we need to be able to select only one face of each brush. To do this hold Ctrl + Shift and click the faces to texture. Select all those outside and paint them with wallpaper, and select all those inside the cupboard to paint with wood.

After all that, we end up with an enclosed understairs cupboard that we cannot get into. Move any models in the way and create a door as you learnt how to in Part 4 : Joining Rooms.

The understairs cupboard currently has no purpose and so perhaps a basement would be a good idea. Create a new room underneath the main house and paint as you would paint a dark, dingy basement. Now we need a hole into which we shall place our ladder. Make a suitiable sized brush for the outer frame, paint it the same as the doorframes and place it in the floor under the stairs. CSG subtract it from the floor so that you have a wooden patch in the floor. Make a new brush, slightly smaller, put it in the frame and use CSG subtract again to create a hole. Remove the second brush or put it on its end against the wall to look like a trapdoor.

For the ladder itself create two long poles that go from the trapdoor to the floor and create rungs every 16 units. It would be best to put the ladder facing the . The trouble with this ladder is that CoD doesn't know that it is a ladder and so you need to add a ladder texture to it. This can be found in the common section of the textures. So that our player can climb all the way up without stopping, the brush with the ladder texture needs to be as high as the poles, strech all the way between the poles, and be about 1 unit further out than the rungs.

You now have a three storey house with stairs and ladders. Add some lights and models to the upstairs and the basement to complete the house.

CoD UO Modding Tutorial - Part 7 : Exteriors

CoD UO Modding Tutorial - Part 5 : Adding Models and Lighting

Our house is rather bare at the moment so it would probably be a good idea to add some furniture to it. Furniture and other pre-made objects are stored as xmodel files in the game's .pk3 files. You can open up the .pk3 files using PakScape and look at the list of the avaliable .pk3 files or you can go here.

The map made in tutorial 4 is avaliable here. Extract all files and place them in [game directory]/UOTools/map_source

To furnish our house we first need to know what each room is for. When building your own maps you should have this in mind before you make the rooms or you may end up too cramped or with too much empty space. I am making the green room into a living room, the blue room into a bedroom and the small room into a toilet.

Lets start with the bedroom and add some models. As with the spawnpoints, models must be placed using the right click drop down menu. Right click and go to Misc > Model. You will see the entity window appear and a file browsing window. Close the browse window, the models we want are already embedded in the game. If you look around the house to where you placed the model, you will find a red box, which is obviously not what we want. In the entity box there are two text lines, one labelled Key and one labelled Value. Type 'model' in Key and 'xmodel/canopybed' in Value. The red box will change to a four poster bed, this house's owner is obviously very well off. Search this website for more items for the house and add them in (you can use the rotation compass in the entity window to rotate models too) until you have something like this.


Our house will be very bright and uniformly lit unless we add our own lighting to it. It makes sense for light to come from somewhere and it looks really bad if it doesn't so we need to add models of lights to our house. I suggest that we have some table lamps and a ceiling light in the middle of the room. For the table lamps I am using xmodel/lamp_ornate_on and for the cieling lights xmodel/light_ind_ceiling2on. These lights look nice but will not actually produce any light. We must create a light from the right click menu. Take the light you have created, shown by a diamond, and place it just above the light. You cannot place lights within models, they end up being completely black.

Compile and play the map and you will find that the lights are way too bright, giving the feel that there is actually no lighting. We need to change this so return to Radiant and select a light. Bring up the entity window and type in light as the key and 50 as the value. Lights are set to an intensity of 300 by default so this light will be one sixth of its origional intensity. Change the lamps to 50 and the ceiling lights to 100 for the best effect.

You can now make complete, fully finished interiors in Call Of Duty and are ready to begin linking floors and making external environments.

CoD UO Modding Tutorial - Part 4 : Joining Rooms

Making isolated rooms is a start but it will not get us creating complex buildings to immerse our players. We shall use the map from the previous tutorial and add more rooms to it. If you were unable to create the map it is availiable here. Extract the rar archive and place its contents in [game directory]/UOTools/map_source.

The new room will be situated to the left of the one we already have so create a new brush there, raise the roof to the same height as the origional room and hollow it out. Paint the walls, floor and cieling: keep the floor and ceiling the same but change the wallpaper for the blue one. (To see the textures already in use press 'U') This is what you should end up with, I have placed the camera in the middle of the wall to make it look as though there is no wall, even though there is, as you can see on the 2D view.


We now need a doorway connecting the two rooms so our CoD player can move inbetween the rooms. It is always good to have a door frame around our door so make a brush that passes through the wall completely and is at least 32 wide so our player can squeeze through.

This brush does not allow our player through, in fact there is now more in his way. To make a hole we need to 'subtract' the door frame from the wall and then 'subtract' a doorway from the door frame. The 'CSG Subtract' tool will do this for us in most cases.

The CSG Subtract Tool

Note: Never use CSG Subtract with more than one brush selected.
Note: I always save before doing a CSG Subtract, it can very often crash Radiant if it finds the objects you are wanting to cut too complicated.

Once you have subtracted the door frame from the wall you will need to make an opening for players to walk through. To do this, clone the door frame (select it and press the spacebar) and then move it back onto the origonal door frame (when cloning the new brush is moved one grid unit down and one grid unit to the right). Then push in the top and sides so that the doorway has a one unit indent from the door frame.

Press the CSG Subtract button to make an opening and then delete the inner brush by pressing backspace. Your door is finished but if you look at the floor you will see some wall textures flashing around the threshold. Try selecting the bits of floor and deleting them. It is likely that you will select the larger floor surface that you want to keep: in this case, just select the piece of wall again so that you have both selected and then deselect the larger floor (by shift clicking). Delete the wall sections on both sides so that you have one continuous floor texture through both rooms.
Now add another small room coming off the main room and create a similar doorway connecting them. Paint the new room with some textures suitable for a kitchen as that is what it is intended to be. In a kitchen the floor is unlikely to be wooden so we will have a texture change in the doorway. This can look messy so placing a threshold will tidy things up.

The house is now ready for some furniture and lights, which will be added in the next section.


CoD UO Modding Tutorial - Part 3 : Spawn Points, Compiling and Testing

We currently have an empty room and no way of the player entering the map to play in it. To add a spawn point right click on the 2D view and navigate the menu to find mp > deathmatch_spawn; then click on it. An orange box will appear in the 2D and 3D window. Have a look in the 3D window to make sure that it is at the correct height (on the floor). We then need to give the spawn point an orientation to indicate which way our player leaves it. With the spawn point selected press 'n' to get the entity window.

At the bottom left of the entity window there is a series of buttons that make up a compass, numbered 45 to 360. These correspond with the 2D view so if you were to press 270, which is at the bottom of the compass, your entity (in this case the spawnpoint) will be facing downwards in the 2D view. My spawn point is in the corner and I want it facing into the middle of the room so I will select 225.

Note: On a diagonal spawnpoints and other entities can look rather odd, having a box in a box: this is perfectly normal.

As our player can now spawn within the our room it is possible for us to test the map. However, there is a rather complicated step required in gettting a map from the editor to the game. Firstly, save your map. Now open up your game directory and go to uo\maps. Here you should find your map that you just made. Make a new text document in the folder (Right click > New > Text Document) and open it in notepad. Paste in the following text and replace [map name] with your map name.

cd ..\..\UOtools\bin

q3map ../../uo/maps/[map name]
q3map -vis ../../uo/maps/[map name]
flare -extra -sundiffusesamples 10 -dumpoptions ../../uo/maps/[map name]

cd ..\..\

Note: For CoD Radiant (not UO) editors go to main\maps and use this text.

cd ..\..\tools\bin

q3map ../../main/maps/[map name]
q3map -vis ../../main/maps/[map name]
flare -extra -sundiffusesamples 10 -dumpoptions ../../main/maps/[map name]

cd ..\..\

Save the document, but when you save it type .bat after the name and under 'Save as Type' change 'text documents' to 'all files'. You now have a batch file which will compile your map for you simply by double clicking on it. Do that now and you will see a black command window. Most of it will look like nonsense so just ignore it and wait for it to finish. Once it has finished go back to your map folder and you should see a few files, a .prt, a .poly and a .bsp. The .bsp is the only one we want so select it and move it into the mp folder. I suggest that you delete the .prt, .poly and sometimes the .lin or your folder will get too confusing.

The map is now compiled and ready to use in game. Start CoD or UO MP and select 'Start New Server' from the menu. Our map is in an unpacked .bsp format so to play it we need to tell CoD to run an unpure server. Set 'Pure' from the main options menu on the new server screen to No and begin the server (the map you choose does not matter). When the map is loaded bring down the console (using ¬, thing left of 1) and type 'map [your map name]'.

Congratulations! You have now made your first CoD/UO map and played it in game (assuming you didn't come across any problems on the way)


Monday, 22 June 2009

CoD UO Modding Tutorial - Part 2 : Making a Simple Room, Texturing and Using the Camera

Now that the toolset is ready it is time to make our first map. By part 3 we will have a very simple room with textured walls, floor and ceiling in which we can play. But before we can add spawns to it we must build the room itself.

In CoD Radiant and CoD UO Radiant, structural objects are called brushes. To make a new brush that will be our room click in the largest box (the one on the left but not the far left) and drag out a square. The brush we have just created should appear in the top right box, the 3D window as a blue spotty slab.

Some of you will have already noticed that the diamond with two lines sticking out of it in the 2D view is the camera and what you can see in the 3D window is what that diamond would be able to see if it was alive. To see what our map looks like we will need to be able to manipulate the camera and move around with ease. The most important camera movement is the horizontal panning which can be done by holding down the right mouse button and moving around or by using the arrow keys on the keyboard. Panning with the mouse works in both the 2D and 3D views, but using the keyboard only works in the 3D view so I prefer to use the right click panning method. To zoom in and out in the 2D view drag the rollerball backwards and forwards as you would do in most applications with a zoom function. To pan vertically in the 3D view press and hold Ctrl and then right click and drag around.

From all that moving you will probably have realised that our brush is too flat to become a room suitiable for a CoD player to use and so we need to make it taller. When editing objects in the 2D view, you can click and drag from somewhere inside the brush which will move the object, or you can click and drag outside the object which will drag the sides of the brush. Experiment with this in the 2D view and you will find that you can make any shape floor you want but you cannot raise the walls and cieling. To do this you must click and drag outside the shape in the vertical window (far left). Click above the blue box with the red outline and drag so that it is about 128 high (a CoD player is about 64 high)

We now have a box, a solid box which we cannot go inside. To be able to go inside our room we need to hollow it out using the hollow tool. Click on this and the room will be hollowed with walls the same thickness as one grid unit. (The grid can be changed either by going to the Grid menu at the top or by pressing the number keys 1 to 9. Grid 1 is in increments of 1, Grid 2 is in increments of 2, Grid 3 is in increments of 4, and so it goes on in ascending powers of 2) You should now have a hollow room; move the camera inside it.

The Hollow Tool
In Call of Duty there aren't usually many spotty blue objects hanging around so we need to find some suitiable textures to paint our room. From the texture menu at the top we can select from many different texture sets that contain textures for all aspects of the game. For a basic room it is probably best to go for the Normandy texture set as it has a lot of general textures in it. We will start with the walls so select this subset and scroll down the images in the texture box (bottom right) until you find this very scruffy looking wallpaper.

You will now need to select the walls to texture. In radiant selecting is always done using Shift + Left Click. This works for multiple selecting too so select all of the walls and click on the texture in the texture window. Find suitable ceiling and floor textures from the corresponding subcatergories within Normandy and apply them to the ceiling and floor.

We have now made our first room in CoD Radiant, but we can not yet play it.

CoD UO Modding Tutorial - Part 1 : Setting up the Toolset

It is advisable to play CoD or UO online for a while first and see the maps other people have made so that you know what can be done in the toolsets and get some ideas for yourself. By playing other people's maps, you will also have their textures automatically imported into your toolset to give you some more options in how you wish to make your maps.

When you are ready to begin you will need
the CoD Radiant or CoD UO Radiant toolset, depending on whether you have UO or not (If you have both it is always best to use UO because of the increased number of features and the larger texture selection). Below are the links for both downloads.


Once installed you should have a shortcut placed on your desktop. If not then goto your game directory and drag a shortcut to the application onto the desktop. It will be in [game directory]/Tools/Bin or [game directory]/UOTools/Bin, where [game directory] is the location of CoD, most likely C:/Program Files/Call Of Duty/ or C:/Program Files/Call Of Duty United Offensive/

The next step is to open the toolset (obvious really) so click on the desktop shortcut.

Note : I will be using the United Offesive Toolset but if you are using normal Radiant then the screenshots and some of what I am saying will not correspond. However, the two toolsets are very similar.

This is the screen that should appear when you open UO Radiant for the first time.

Before we begin getting stuck in and exploding with creativity we need to check some features of the toolset. To begin, go to File > Game Settings > Edit... and you should see something like this.

Make sure that your game settings look mine, as are shown below, but replace [game dir] with your game directory.

Basepath [game dir]
SP Map Source [game dir]\UOTools\map_source
MP Map Source [game dir]\UOTools\map_source
rshcmd [game dir]\UOTools\bin\
remotebasepath [game dir]\uo
entitypath [game dir]\UOTools\bin\coduo.def
texture dir textures
game dir uo
base game dir main
Autosave Directory [game dir]\Call of Duty\map_source\autosave
SP Map Path [game dir]\uo\maps
MP Map Path [game dir]\uo\maps\mp

Note: CoD Radiant will have less and those that include "UOTools" should be replaced with "Tools", and those that include "uo" should be replaced with "main" (e.g. SP Map Path - [game dir]\main\maps).

Once these settings are correct you should be able to start building.


CoD UO Modding Tutorial

This tutorial aims to teach people how to mod Call Of Duty and United Offensive in as little time and with the best results possible. I will teach you how to create complex maps, both interior and extorior, with textures, models and lighting. Click on part 1 below to get started.

Part 7 : Exteriors
Part 8 : Terrain Editing

And more anticpated in the near future